
The Ultimate Guide to Using Aluminum Foil for Highlighting Hair
The Benefits of Using Aluminum Foil for Highlighting Hair
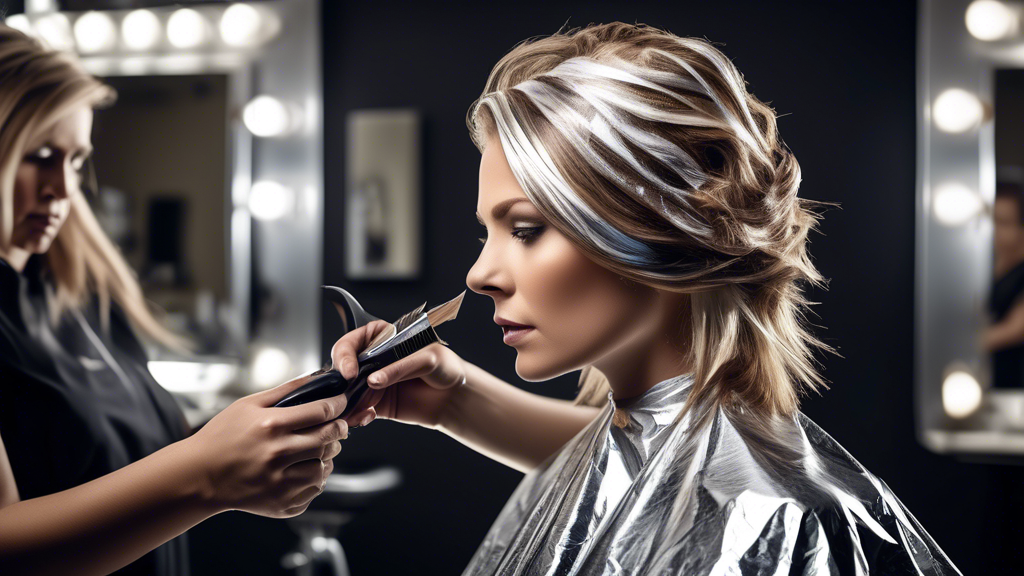
Highlighting hair has long been a favorite technique for adding depth, dimension, and a sun-kissed glow to any hairstyle. When it comes to precision and effectiveness, using aluminum foil for highlighting hair stands out as a superior method.
Why Aluminum Foil is Preferred Over Other Methods
Aluminum foil is often preferred by both professional stylists and at-home enthusiasts for several compelling reasons. Its unique properties provide excellent heat conduction, which is essential for even color development. Moreover, foil allows for precise application, ensuring that the coloring agents penetrate the hair evenly and thoroughly. Unlike other methods, it offers a controlled environment that minimizes the risk of color bleeding and overlap.
How Aluminum Foil Enhances Color Precision and Development
The use of aluminum foil in highlighting hair ensures that each section of hair treated is isolated and protected. This isolation not only prevents any unintended color mixing but also preserves the integrity of the color pattern intended by the stylist. Additionally, the reflective nature of the foil enhances heat distribution, which accelerates the color-processing time and leads to more vibrant results.
Versatility for At-Home and Professional Use
Another standout benefit of using aluminum foil for highlighting hair is its versatility. Whether you're a seasoned salon professional or an at-home DIY enthusiast, aluminum foil provides a reliable and straightforward solution for achieving salon-quality highlights. Its ease of use, combined with its affordability and accessibility, makes it a go-to choice for individuals looking to customize their hair color to perfection.
In this ultimate guide, we will delve deeper into the specific benefits, techniques, and tips for flawlessly highlighting hair using aluminum foil. By the end of this article, you'll be ready to take on any highlighting challenge with confidence and skill.
The Benefits of Using Aluminum Foil for Highlighting Hair
Why Aluminum Foil is Preferred Over Other Methods
When it comes to highlighting hair, using aluminum foil is a technique that has stood the test of time. One of the primary reasons aluminum foil is preferred over other methods, such as cap highlighting or balayage, is its ability to provide precise color application. Unlike cap highlighting, which can sometimes result in uneven color patches, aluminum foil allows for meticulous control over where the dye is applied. Each section of hair can be individually wrapped, preventing the color from bleeding onto surrounding areas.
Another advantage of using aluminum foil is its heat-conductive properties. The foil acts as a barrier that retains heat, thereby accelerating the chemical reaction between the hair dye and the hair. This results in faster processing times and more vibrant, longer-lasting highlights. Additionally, aluminum foil is widely available, inexpensive, and easy to work with, making it an attractive option for both professional stylists and DIY enthusiasts.
How Aluminum Foil Enhances Color Precision and Development
Aluminum foil is the go-to method for those who seek high precision in their hair color application. The key here is the ability to isolate exact sections of hair, which is particularly beneficial for complex color jobs that require multiple shades or intricate patterns. Unlike other methods that can be messy and imprecise, using aluminum foil ensures that the dye stays exactly where it is intended.
This precision is further enhanced by the rigidity and flexibility of aluminum foil. The foil can be easily folded and shaped to fit snugly around each section of hair, safeguarding the dye from external elements and ensuring that it penetrates deeply into the hair strands. This encapsulation method also helps in even color development, avoiding the common issue of patchy or uneven highlights.
Moreover, the reflective properties of aluminum foil contribute to the effective distribution of heat during the dyeing process. By reflecting heat back onto the hair, foil not only speeds up the chemical reactions but also ensures that the color develops uniformly. This technique significantly reduces the risk of under-processed or over-processed sections, delivering stunning, professional-quality results every time.
Versatility for At-Home and Professional Use
The versatility of aluminum foil makes it suitable for both at-home and professional use. For those who prefer a DIY approach, aluminum foil offers a practical and accessible method to achieve salon-quality highlights. It requires basic tools and materials that are easily available, coupled with straightforward techniques that even beginners can master with a bit of practice.
Professionals, on the other hand, benefit from the dependability and flexibility that aluminum foil provides. Whether dealing with simple highlights or complex color transformations, aluminum foil allows stylists to execute their vision with immaculate precision. Additionally, because foil is easy to customize, it can be tailored to fit various highlighting techniques—be it classic highlights, lowlights, or more modern styles like foilayage.
Another significant benefit for at-home users is the control that aluminum foil gives them over the whole process. By isolating each section of hair, individuals can monitor the progress more effectively and adjust their techniques as needed. For professional stylists, aluminum foil not only enhances their efficiency but also allows them to manage multiple clients simultaneously, increasing their productivity without compromising on quality.
In conclusion, the benefits of using aluminum foil for highlighting hair are numerous and compelling. From its unparalleled precision and effective heat conduction to its versatility for both amateurs and professionals, aluminum foil remains a favored choice for highlighting hair. This age-old technique continues to deliver stunning, consistent results, making it a cornerstone in the world of hair coloring.
Step-by-Step Guide to Highlighting Hair with Aluminum Foil
Essential Tools and Materials Needed
Before starting the process of highlighting hair with aluminum foil, it is crucial to have all the necessary tools and materials at hand. The key items you will need include:
- Aluminum Foil: Pre-cut sheets or a roll that can be cut to size. The foil should be thick enough to hold its shape but flexible enough to wrap around hair sections.
- Highlighting Brush: A specific brush designed for applying hair dye. It usually has a fine tip for precision.
- Mixing Bowl: A non-metallic bowl to mix the color or bleach.
- Hair Clips: Sectioning clips to separate parts of the hair.
- Comb: A tail comb is particularly useful for dividing sections of hair.
- Protective Gloves: To protect your hands from chemicals.
- Hair Dye or Bleach: Depending on the type of highlight desired.
Preparing Your Hair for Highlighting
Preparation is key to achieving beautiful, professional-looking highlights. Follow these steps to prep your hair:
- Clean Your Hair: Start with clean, dry hair. It's best to wash your hair the day before highlighting to ensure it's free of oils but still retains natural oils that protect the scalp.
- Brush Thoroughly: Remove all knots and tangles to make the sectioning process easier.
- Protect Your Skin and Clothes: Use a towel or a cape to cover your shoulders and apply a thin layer of petroleum jelly around your hairline to protect your skin from dye or bleach.
Detailed Process: Sectioning, Applying Color, and Wrapping with Foil
Once your hair and tools are prepped, you're ready to begin the highlighting process:
Sectioning the Hair
Proper sectioning is fundamental for even color application:
- Divide your hair into four main sections: two at the front and two at the back. Use hair clips to keep these sections separate.
- Within each main section, create smaller, more manageable sections that are about half an inch thick.
- Use the tail comb to help create these small sections accurately.
Applying the Color
With your hair properly sectioned, you can start applying the color:
- Mix the hair dye or bleach according to the manufacturer’s instructions in the mixing bowl.
- Take a small section of hair and place a piece of aluminum foil underneath it. The foil should be long enough to fold over the hair section completely.
- Using the highlighting brush, apply the color or bleach starting from the roots (if you want full highlights) or from mid-lengths (for a more natural, sun-kissed look). Make sure to saturate the hair evenly.
Wrapping with Foil
To ensure effective development and prevent the color from bleeding onto other hair sections, foil wrapping is essential:
- After applying the color, fold the bottom edge of the foil up and over the hair section, then fold the sides inward.
- Ensure the foil is snug but not too tight, allowing some space for the hair to expand as it develops.
- Continue this process with each small hair section until all desired highlights are wrapped in foil.
Processing Time and Rinsing
Development time will vary based on the product you use and the desired intensity of the highlights:
- Check the foils periodically. Most hair dyes and bleaches take between 20 to 45 minutes to develop.
- Once the desired level of lightness is achieved, gently remove the foils and rinse each section thoroughly with lukewarm water.
- Use a sulfate-free shampoo and conditioner to wash and condition your hair, preserving the vibrancy and health of your freshly highlighted locks.
Final Touches
After rinsing the color out, consider giving your hair some extra attention:
- Apply a deep conditioning treatment to nourish and hydrate your hair.
- Dry and style your hair as desired to showcase your new highlights.
By following these steps, you can achieve salon-quality highlights using aluminum foil within the comfort of your home.
Tips and Tricks for Perfect Highlights Using Aluminum Foil
Best Practices for Preventing Hair Damage
When it comes to highlighting hair with aluminum foil, it's essential to prioritize the health of your hair to prevent damage. Here are some best practices to ensure your hair remains healthy and vibrant:
1. Use a Quality Lightener: A gentle, high-quality lightener is crucial for minimizing damage during the highlighting process. Avoid using high-level developers unnecessarily, as they can weaken hair strands.
2. Apply Heat Sparingly: Excessive heat can cause severe damage to your hair. While aluminum foil helps to develop the color more quickly, try to avoid using additional heat sources like blow dryers. If heat is necessary, ensure it's at a low setting.
3. Deep Condition Regularly: Before and after highlighting, use deep conditioning treatments to maintain the moisture and health of your hair. Conditioning treatments can help to fortify your hair against the lightening process.
4. Protect Your Scalp: To prevent irritation, avoid applying the lightener too close to the scalp. Maintaining a small distance will reduce the risk of chemical burns or discomfort.
5. Follow Recommended Processing Times: Over-processing can lead to brittle, damaged hair. Always adhere to the recommended processing times specified by your lightener's instructions.
How to Achieve Different Highlighting Techniques
Aluminum foil for highlighting hair is highly versatile and can be used to achieve various highlighting techniques, including balayage and foilayage. Here's how:
Balayage: This technique involves hand-painting the lightener onto the hair to create a natural, sun-kissed effect. To achieve balayage with aluminum foil:
- Section off small pieces of hair and backcomb them slightly to soften the transition.
- Apply the lightener sparingly to the ends and mid-lengths of each section, avoiding the roots for a more natural look.
- Wrap the painted sections loosely in foil to develop the color without strict lines.
Foilayage: Foilayage combines the freehand technique of balayage with the precision of traditional foiling. To achieve this look:
- Similar to balayage, lightly backcomb the sections you plan to highlight.
- Apply lightener in a sweeping motion, focusing on the ends and ensuring a seamless blend.
- Wrap the sections in foil to enhance color development while maintaining the natural blending of balayage.
Traditional Highlights: For classic highlights with defined, even color distribution:
- Section the hair into small, thin slices for even application.
- Apply lightener evenly from roots to tips on each section.
- Wrap each section tightly in foil to ensure a crisp, consistent color result.
Troubleshooting Common Issues and FAQs
Even with the best techniques, you may encounter some challenges when highlighting hair with aluminum foil. Here are solutions to common problems and answers to frequently asked questions:
Patchy Highlights: Uneven application or inconsistent foil wrapping can lead to patchy highlights. To fix this:
- Ensure even saturation of the lightener on each section.
- Double-check the foil placement to prevent slippage or uneven color development.
Bleed Lines: Color bleeding from one section to another can create unwanted lines. To prevent this:
- Secure each foil tightly and avoid overloading with lightener.
- Place a piece of cotton or tissue at the base of each foil section to absorb any excess product.
Over-Processing: If your hair feels brittle or dry, it may have been over-processed. To address this:
- Immediately rinse the lightener with cool water and apply a deep-conditioning mask.
- Trim any damaged ends and incorporate strengthening treatments into your hair care routine.
FAQs:
Q: Can I use any type of aluminum foil for highlighting hair?
A: It's best to use professional-grade aluminum foil designed for hair coloring. While kitchen foil can work in a pinch, salon-quality foil is often thinner and easier to manipulate.
Q: How long should I leave the foil in my hair?
A: Follow the specific time guideline provided by your lightener. Generally, processing times range from 20 to 45 minutes depending on the desired lift and the condition of your hair.
Q: Can I highlight my hair at home using aluminum foil?
A: Yes, with the right tools and preparation, you can achieve professional-looking highlights at home. Be sure to follow instructions carefully and consider enlisting help for more precise application.
Using aluminum foil for highlighting hair can yield stunning, salon-worthy results. By following these tips and tricks, you can achieve the perfect highlights while keeping your hair healthy and vibrant.
Conclusion
Using aluminum foil for highlighting hair can transform your hairstyle, offering both precision and versatility whether you're at home or in a professional salon. The benefits of aluminum foil, including its enhancement of color precision and development, make it a preferred choice over other methods. Following the step-by-step guide and utilizing the tips and tricks provided can help you achieve beautiful, professional-grade highlights without causing damage to your hair.
Remember, the key to successful highlighting is preparation and attention to detail. With the right tools, materials, and techniques, you can experiment with different highlighting styles such as Balayage or Foilayage to find the perfect look for you. Embrace the power of aluminum foil for highlighting hair, and enjoy the stunning results it can deliver.
Whether you're a professional stylist or an at-home DIY enthusiast, mastering the art of using aluminum foil for highlighting will undoubtedly elevate your hair game. So go ahead, wrap those foils, and step into a world of vibrant, precisely colored hair!