
Achieve Stunning Highlights with Hair Foils: A Comprehensive Guide
Understanding the Basics of Hair Foils for Highlights
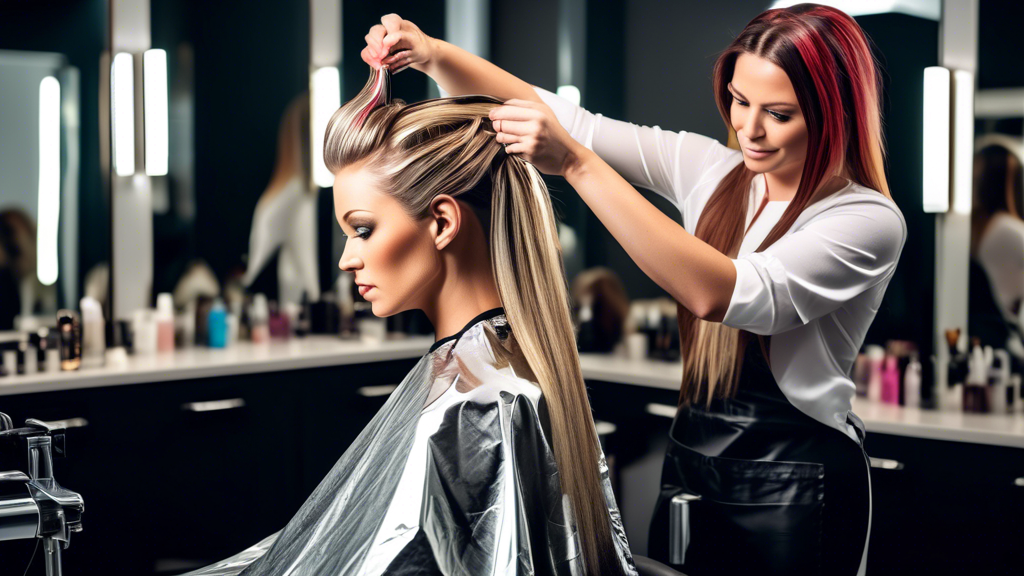
Adding dimension and brightness to your hair can be effortlessly achieved with the right techniques, and one of the most popular methods is using hair foils for highlights. Whether you're a hairdressing pro or someone looking to add some flair to their locks at home, understanding the role and effectiveness of hair foils is essential. Hair foils serve as a crucial tool in isolating sections of hair during the coloring process, ensuring precise application and stunning results.
Explanation of Hair Foils and Their Purpose
Hair foils are thin sheets of aluminum foil used by hairstylists to wrap sections of hair during the highlighting process. Their primary purpose is to separate and keep specific hair strands distinct from the rest, allowing for targeted coloring. This method enables better control over the lightening process and provides a more even and natural-looking outcome.
Benefits of Using Hair Foils for Highlights
There are numerous advantages to using hair foils for highlights, making them a favored technique in salons and among DIY enthusiasts. Foils allow for precise application, preventing color bleeding and ensuring that only the intended sections are lightened. They also help achieve a more controlled lift, meaning less damage to your natural hair. Additionally, hair foils can produce more natural-looking highlights with varying degrees of brightness and depth, depending on the application technique and processing time.
Different Types of Hair Foils Available
When it comes to hair foils for highlights, options are plentiful. Traditional aluminum foil is the standard choice, but there are also pre-cut foils, pop-up foils, and foils with different thicknesses and textures to cater to various stylistic needs. Some foils come with a non-slip grip, making them easier to handle and apply. Choosing the right type of foil can enhance the highlighting process and contribute to achieving the desired look.
Understanding the Basics of Hair Foils for Highlights
Explanation of Hair Foils and Their Purpose
Hair foils are essential tools in the hairstyling world, especially when it comes to achieving stunning highlights. These thin sheets of aluminum are used by professionals and at-home stylists to isolate sections of the hair during the coloring process. The primary purpose of hair foils for highlights is to keep the color or bleaching agent from bleeding onto the surrounding hair, thereby creating a clear, defined, and precise highlight or lowlight effect.
When applying highlights, foils serve to wrap and protect the sectioned hair, ensuring that the color penetrates evenly and prevents any undesirable overlap. This results in natural-looking highlights that can be as subtle or as dramatic as desired. Additionally, foils can help to control the development time of the color, allowing for multiple shades and tones to be achieved in one application session.
Benefits of Using Hair Foils for Highlights
The use of hair foils for highlights presents several advantages that contribute to the popularity of this technique:
- Precision and Control: Foils allow for precise application of color to specific hair strands, enabling stylists to create intricate and detailed highlights.
- Multi-Tonal Effects: By sectioning off and treating different parts of the hair separately, foils can help achieve multi-dimensional color effects, adding depth and richness to the hair.
- Reduced Risk of Damage: By keeping the coloring agent contained and away from other hair sections, the risk of damaging the entire head of hair is minimized.
- Customized Coloring: Foils enable a customized approach, allowing for varied color placement and blending techniques tailored to individual preferences and hair types.
- Enhanced Lightening: The aluminum in the foils retains heat, which can accelerate the lightening process, making it more efficient and effective.
Different Types of Hair Foils Available
When it comes to choosing hair foils for highlights, there are several types available, each catering to different needs and preferences. Here's a look at the most common options:
- Standard Aluminum Foils: These are the most widely used foils in salons. They are durable, easy to use, and come in various sizes. Their primary function is to isolate hair sections and accelerate the coloring process.
- Pre-Cut Foils: These foils come in pre-measured sizes, making them convenient and time-saving for both professionals and home users. They eliminate the need for cutting, ensuring uniformity in application.
- Pop-Up Foils: Designed for quick access and efficiency, pop-up foils are presented in a tissue-box style dispenser, allowing stylists to grab one foil at a time without having to deal with rolls or stacks.
- Textured Foils: Featuring a slight texture, these foils offer better grip on the hair, preventing slippage and ensuring that the coloring agent stays in place during the application process.
- Color-Coded Foils: Available in different colors, these foils help in distinguishing between various stages of the highlighting process or different colors being used, enhancing organization and precision.
- Eco-Friendly Foils: Made from recycled materials, these foils cater to environmentally conscious individuals looking to reduce their carbon footprint while still achieving beautiful highlights.
Understanding these nuances and benefits of hair foils for highlights can significantly enhance the outcome of your highlighting process, whether performed at home or in a salon. By selecting the right type of foil and applying it correctly, you can achieve those stunning, sun-kissed locks that make heads turn. Dive deeper into our guide to learn the step-by-step process and tips for perfect highlighting with hair foils.
Step-by-Step Guide to Using Hair Foils for Highlights
Prepping Your Hair: Essential Tools and Products
Before diving into the art of using hair foils for highlights, it's crucial to gather all necessary tools and products. Having the right equipment ensures not only precision but also the health and quality of your hair. Here's what you’ll need to get started:
- Hair Foils: Pre-cut aluminum foils specifically designed for hairstyling or regular aluminum foil cut into strips.
- Sectioning Clips: These will help to keep your hair neatly organized while you work on each section.
- Highlighting Comb or Brush: To apply the bleaching or coloring agent efficiently.
- Bleach or Highlighting Color: Choose a product that suits your hair type and desired highlight color.
- Developer: Works in conjunction with bleach or color to lighten the hair.
- Gloves: Protect your hands from harsh chemicals.
- Old Towel or Cape: To protect your clothes from spills and stains.
Once you've assembled your tools, make sure to perform a patch test with your bleach or color to avoid any allergic reactions.
Sectioning the Hair for Effective Foiling
Proper sectioning of your hair is the backbone of achieving beautiful highlights with hair foils. It ensures even color distribution and avoids any haphazard patterns. Follow these steps to section your hair effectively:
- Start with Clean, Dry Hair: Wash and thoroughly dry your hair before starting the highlighting process. Clean hair helps the color adhere better.
- Divide the Hair into Major Sections: Begin by dividing your hair into four large sections – two at the front and two at the back. Use sectioning clips to secure each part.
- Smaller Sub-Sections: Take one of the larger sections and divide it into smaller segments. Each sub-section should be thin enough for the bleaching or coloring agent to penetrate effectively.
- Positioning the Foils: Place a piece of foil underneath each sub-section close to the scalp, ensuring that the foil catches all the strands of hair.
Remember, precision in sectioning significantly impacts the final result, so take your time to get it right.
Applying Highlights with Hair Foils: Techniques and Tips
Now that your hair is prepped and sectioned, it's time to apply the highlights. This part requires attention to detail and a steady hand. Follow these steps for flawless application:
Step 1: Mix Your Product
Combine the bleach or highlighting color with the developer according to the instructions on the packaging. Mix it well until you achieve a consistent, creamy texture. Make sure you’re wearing gloves during this process for safety.
Step 2: Apply the Product
Starting with one of the small sub-sections, take your highlighting comb or brush and apply the mixture from roots to ends. Ensure an even application to avoid a patchy look.
Step 3: Encase in Foil
Once you've coated the hair, fold the foil over the hair strands. Secure the ends by folding them again to keep the hair snug inside the foil. The foil acts as a heat conductor, helping the bleach or color to work faster and more efficiently.
Step 4: Repeat the Process
Continue this method for each sub-section of your hair, systematically working through each major section. Work methodically to ensure that you don’t miss any parts.
Step 5: Check the Development
Developing time can vary depending on the desired result and the natural color of your hair. Check the progress every 10 minutes by gently unfolding a foil to see if the hair has lifted to the desired level. Once achieved, carefully rinse that section to halt the processing.
Step 6: Rinse and Tone
After processing, remove all the foils and rinse your hair with lukewarm water. Follow up with a color-safe shampoo and a hydrating conditioner. If necessary, apply a toner to neutralize any unwanted brassy tones.
Finally, style your hair as desired. For lasting results, avoid heat-styling tools immediately after highlighting and give your hair some TLC with nourishing hair masks.
Using hair foils for highlights can be a bit daunting at first, but with patience and practice, you can achieve salon-quality results right at home. This detailed, step-by-step guide is designed to help you master the technique and enhance your hair’s natural beauty with stunning highlights.
Maintaining and Caring for Your Highlighted Hair
Post-Highlight Hair Care Tips
Once you've achieved stunning highlights using hair foils, it's essential to follow a proper hair care routine to maintain the vibrancy and health of your highlighted hair. Immediately after highlighting, your hair may feel more sensitive and prone to damage. Here are some crucial post-highlight hair care tips:
Avoid Washing Hair Immediately: Give your hair at least 48 hours before its first wash post-highlighting. This waiting period helps the color to set in properly, ensuring long-lasting benefits from the hair foils for highlights.
Minimize Heat Styling: Hair dryers, straighteners, and curling irons can strip your hair of moisture, causing it to become dry and brittle. If you must use heat styling tools, apply a heat protectant spray to shield your highlights.
Cold Water Rinse: Rinsing your hair with cold water helps to seal the hair cuticles, maintaining the vibrancy of the highlights. Hot water can open up the cuticles, leading to color fading faster.
Regular Trims: Keep your hair healthy by scheduling regular trims every 6-8 weeks. This helps prevent split ends, which can make your highlights look dull and uneven.
Recommended Products for Maintaining Highlights
Using the right products specifically designed for highlighted hair can significantly prolong the life of your highlights and keep your hair looking salon-fresh. Here are some recommended products:
Sulfate-Free Shampoos: Sulfates can strip hair color and natural oils. Opt for sulfate-free shampoos created for color-treated hair to maintain both the health and the color of your highlighted hair.
Color-Enhancing Conditioners: Use conditioners that are rich in nourishing ingredients and formulated to protect and enhance the color of highlighted hair. These conditioners help to maintain the intensity of your highlights by delivering essential nutrients.
Purple Shampoos and Conditioners: If you have blonde or light-colored highlights, purple shampoos and conditioners can help to neutralize brassy and yellow tones, keeping your highlights looking cool and fresh.
Leave-In Treatments: Incorporate leave-in treatments that provide extra protection against UV rays and environmental damage, both of which can fade your highlights. Products enriched with UV filters and antioxidants are excellent choices.
Common Mistakes to Avoid for Long-Lasting Highlights
Even with the best care routine, certain mistakes can compromise the longevity and vibrancy of your highlights. Avoid these common pitfalls to keep your hair looking fabulous:
Over-Washing Your Hair: Washing your hair too frequently can strip it of natural oils and cause color to fade faster. Aim to wash your hair 2-3 times a week and consider using dry shampoo between washes to keep it fresh.
Using Harsh Chemicals: Be cautious of styling products that contain harsh chemicals or alcohol, which can dry out your hair and dull its color. Stick to gentle, color-safe products whenever possible.
Skipping Sun Protection: UV rays from the sun can break down hair color molecules, leading to faded highlights. Always wear a hat or use hair products with built-in UV protection when spending time outdoors.
Neglecting Deep Conditioning: Highlighted hair tends to be more porous and can easily become dry and brittle. Incorporate weekly deep conditioning treatments to maintain moisture levels and keep your hair feeling soft and manageable.
Not Addressing Chlorine Exposure: Exposure to chlorinated water, commonly found in swimming pools, can alter hair color and lead to greenish tints on light-colored highlights. Always wear a swim cap or rinse your hair immediately after swimming to minimize chlorine damage.
By following these maintenance and care tips, you can enjoy beautiful, vibrant highlights for a longer duration. Remember, the key to long-lasting highlights lies in attentive care and using the right products specifically designed for color-treated hair.
Conclusion: Elevate Your Look with Expertly Applied Hair Foils
Embracing hair foils for highlights is a surefire way to add dimension, shine, and a touch of glamour to your locks. This comprehensive guide has taken you through the foundation of understanding hair foils, the methodical steps required to achieve salon-quality highlights at home, and the essential aftercare to maintain your stunning new look.
Transform Your Hair with Confidence
By mastering the use of hair foils, you open up a world of creative possibilities. These tools not only provide precise application but also ensure that your highlights have a professional finish, enhancing your overall appearance. With various types of foils available, from traditional aluminum to pre-cut sheets, you have the flexibility to choose what works best for your hair type and desired outcome.
Commit to Excellence in Hair Care
Remember, maintaining the vibrancy and health of your highlighted hair is just as important as achieving the perfect color. Investing in high-quality hair care products and following a diligent post-highlight routine will keep your highlights looking fresh and radiant for longer periods. Avoiding common pitfalls such as over-washing and using harsh chemicals will further extend the life and luster of your highlights.
With the knowledge and techniques provided in this guide, you are well-equipped to transform your hair into a masterpiece of highlights. Whether you're updating your look for a special occasion or simply seeking a stylish change, hair foils for highlights are your ticket to achieving a stunning, head-turning hairstyle. Go forth with confidence and creativity, and enjoy the beautiful results that hair foils can bring!