
Replacing the Foil on Your Wahl Finale Shaver
Maintaining your Wahl Finale Shaver is crucial for ensuring a close, smooth shave every time. Over time, the foil on your shaver can become worn, reducing its efficiency and potentially causing irritation. Replacing the foil is a straightforward process that can extend the life of your shaver. Follow this step-by-step guide to replace the foil on your Wahl Finale Shaver.
What You Will Need
Before you begin, ensure that you have the following items:
- A replacement foil and cutter bar assembly compatible with your Wahl Finale Shaver.
- A small brush for cleaning (often provided with your shaver).
- A soft cloth for wiping down the shaver.
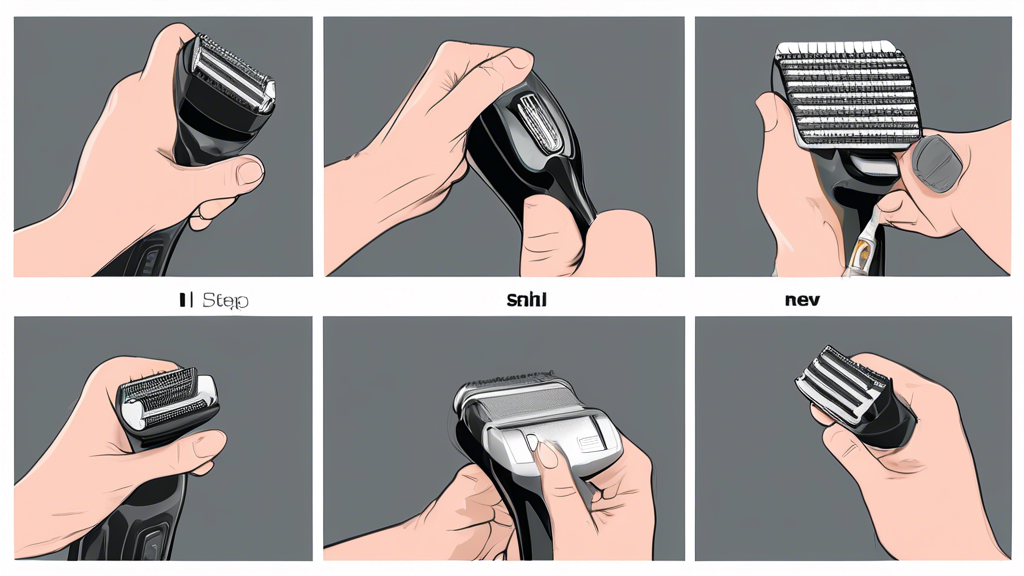
Step-by-Step Guide
Step 1: Turn Off and Unplug the Shaver
Safety first! Ensure that your shaver is turned off and unplugged before you begin the replacement process. This minimizes the risk of electrical shock and ensures that the shaver won’t accidentally turn on while you are working on it.
Step 2: Remove the Old Foil
Carefully remove the old foil by pressing the release buttons on either side of the shaver head. Gently lift the foil away from the shaver. If there is a cutter bar attached, take care not to damage it while removing the foil.
Step 3: Clean the Shaver
Using the small brush, gently clean any hair or debris from the exposed cutter bar and the shaver head cavity. This helps ensure that no obstructions will impede the performance of the new foil. Wipe down the exterior of the shaver with the soft cloth to remove any lingering residue.
Step 4: Install the New Cutter Bar (if needed)
If your replacement kit includes a new cutter bar, carefully remove the old cutter bar by lifting it from its mounted position. Place the new cutter bar in the same position, ensuring that it is securely seated and aligned correctly.
Step 5: Attach the New Foil
Align the new foil with the shaver head and gently press it into place until you hear a click. Ensure that the foil is securely fitted and that there are no gaps between the foil and the cutter bar. A proper fit is essential for optimal shaving performance.
Step 6: Test the Shaver
Once the new foil is securely in place, turn on the shaver to ensure that it operates smoothly. Listen for any unusual sounds or vibrations, which could indicate that the foil is not properly aligned. If everything sounds normal, your shaver is ready for use.
Maintenance Tips
To prolong the life of your new foil and maintain the performance of your Wahl Finale Shaver, follow these simple maintenance tips:
- Clean the shaver after each use to remove hair and debris.
- Avoid pressing too hard on the shaver during use to prevent unnecessary wear on the foil.
- Store the shaver in a dry place to prevent moisture from damaging the foil and cutter bar.
By regularly replacing the foil and maintaining your shaver, you can ensure a close, comfortable shave and extend the life of your Wahl Finale Shaver. Happy shaving!